Appearance
List of illustrations
Animated diagrams
The exposure triangle
Shutter speed, aperture and ISO on three axes, with a bar underneath showing how much light reaches the film. Each step outward on an axis is one stop. The scales run the way the light runs, so a slower shutter, a wider aperture and a faster film all sit further out. The bar is stacked, one length per setting, so its total length is the exposure.
The shutter and the aperture trade against each other first. The shutter slows from 1/250 to 1/60 while the aperture closes from f/5.6 to f/11, then the pair swap the other way. The triangle changes shape each time, but the bar stays on the correct exposure mark. A stop given up by one setting is a stop gained by the other.
ISO then moves on its own, from 400 up to 800 and down to 200. Nothing balances it, so the bar runs past the mark and then falls short of it: one stop over, then one stop under.
The shape of the triangle shows how the three settings are balanced against each other. The bar, not the area inside the triangle, is what says how much light reaches the film.
Aperture opening and closing
An animated cross-section of a lens iris. Eight blades move together to change the size of the central opening. It widens from a small aperture to a large one, then closes again. A high f-number such as f/16 gives the largest depth of field; a low one such as f/1.4 gives the shallowest. The blades have a curved leading edge, so the opening grows smoothly into a rounded polygon. Real aperture blades are curved rather than triangular for exactly this reason.
Aperture and depth of field
The same iris, with the picture it produces beside it. A person is framed as a portrait, head and shoulders, with the sun, hills and two small trees far behind them. As the iris opens the background softens out of focus while the person stays sharp. As the iris closes the background comes back, until the whole picture is sharp. The person sits at the plane of focus, so they are sharp at every setting.
The subject is close to the camera because that is where the effect is honest. Photograph something at a landscape subject's distance and most lenses hold the hills behind it near enough sharp, even wide open.
Focal-plane curtain shutter
How a horizontal cloth focal-plane shutter makes an exposure at a slower speed. Curtain 1 covers the film gate. It travels across to uncover the gate and begin the exposure, then curtain 2 follows to cover it again and end the exposure. Winding the film on returns both curtains to the start together. The seam between them keeps the gate covered on the way back.
Fast shutter speed: a travelling slit
The same shutter at a fast speed. Curtain 2 sets off before curtain 1 has finished crossing the gate, so the gate is never fully open. A narrow slit between the two sweeps across the frame, exposing the film strip by strip. This is why very fast speeds cannot be used with flash. Only part of the frame is uncovered at any instant.
Silver halides in an emulsion
A cross-section of a film's light-sensitive layers. Silver-halide crystals are suspended in a gelatin emulsion coated over the film base. Photons rain down and, where they strike a crystal, leave a small dark latent-image speck. That speck is the invisible record of exposure which development later amplifies.
A grain of silver
How development turns a single exposed crystal into a visible grain. A pale silver-halide crystal holds a latent-image speck. The developer builds the tangled, filamentary grain of metallic silver outward from that speck, consuming the original crystal.
Cyan, magenta and yellow dye clouds
Colour formation during the C-41 process. As the developer reduces silver at a grain, its oxidised by-product reacts with dye couplers. This builds cyan, magenta and yellow dye clouds around the grain. The clouds overlap as subtractive primaries, forming the colours of the negative. The silver is later removed by the bleach and fix, leaving only the dye.
The three filter axes of the colour wheel
A colour wheel of six hues arranged as three complementary pairs: red opposite cyan, yellow opposite blue, and green opposite magenta. The enlarger's subtractive filters are yellow, magenta and cyan, and each sits at its own colour. Arrows show that raising a filter moves the RA-4 print toward the opposite colour: more yellow filtration toward blue, more magenta toward green. The cyan axis is drawn faint because cyan is normally left at zero; yellow and magenta together already reach the red to cyan axis between them.
More yellow filtration makes a bluer print
Three prints of the same neutral subject under different yellow filtration. A yellow filter removes yellow from the enlarger light. Low filtration leaves a yellow cast, balanced filtration gives a neutral print, and heavy filtration leaves a blue cast. The print shifts toward the filter's opposite colour as the filter is raised.
Static diagrams
Darkroom printing workflow
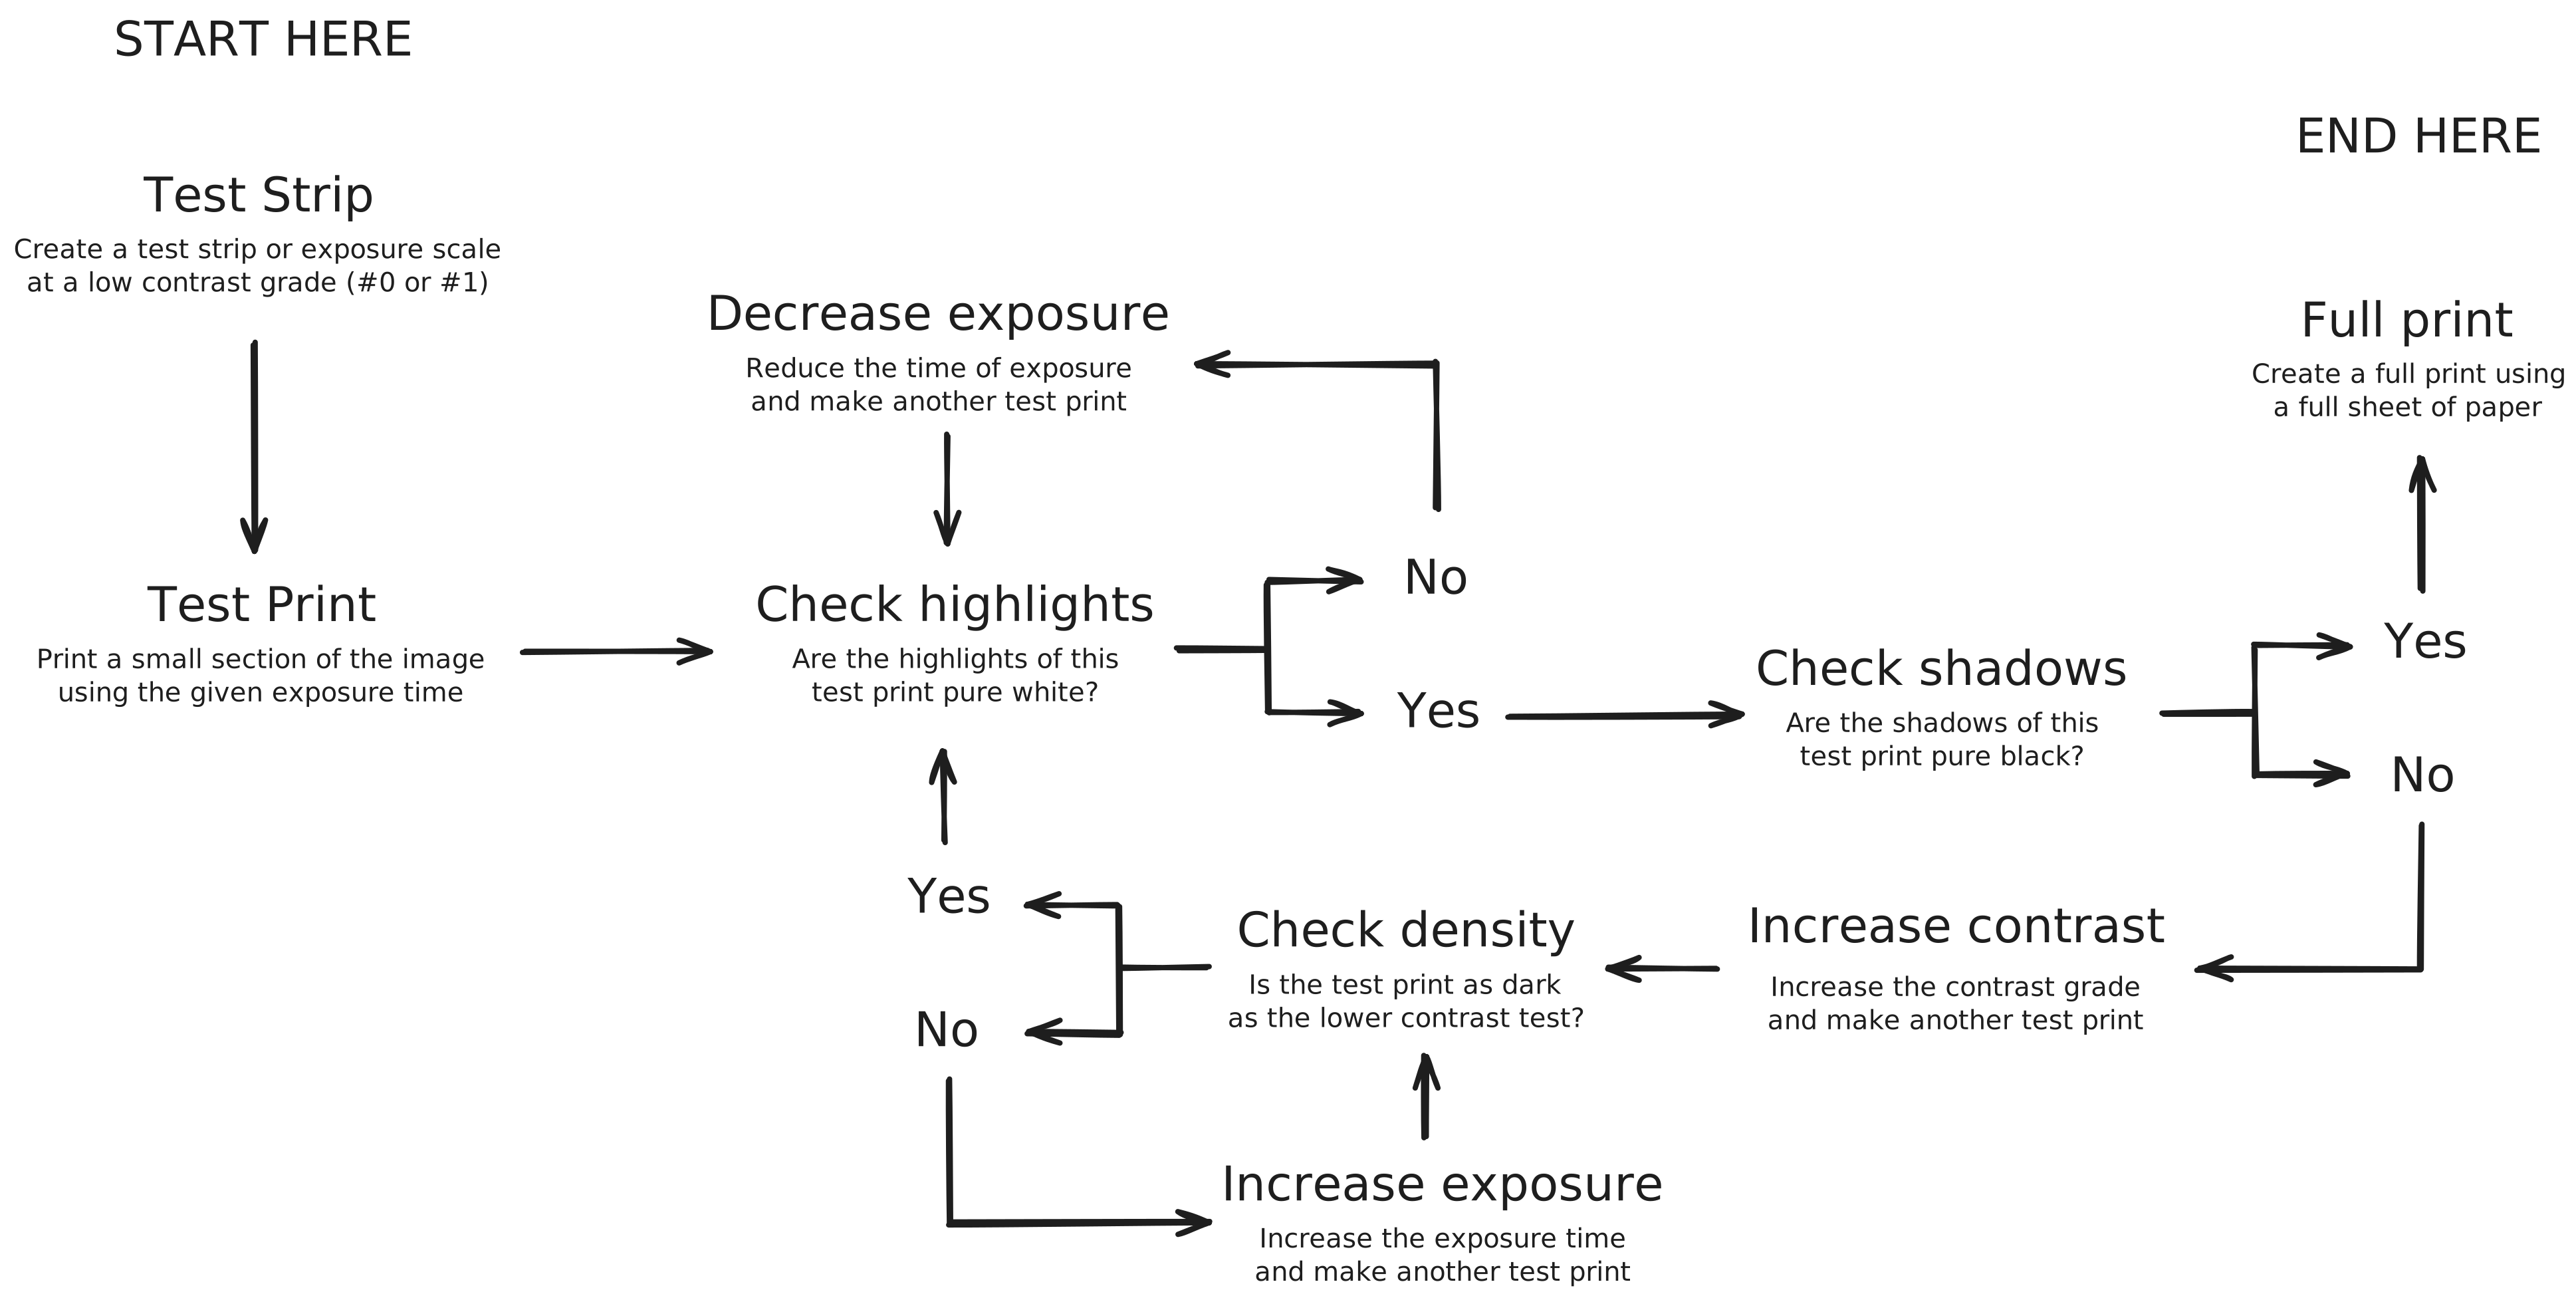
Diagram of the black & white darkroom printing workflow. The process begins with a test strip made to display multiple exposures. Based on the test strip, a test print of a single exposure is made. The test print is evaluated to confirm the highlights are pure white. If not, increased exposure is needed. Where pure white is found, asses the blacks and ensure they are as dark as required. To increase blacks in a darkroom print, increase the contrast grade used during printing. Special care should be made to ensure the density of the print is consistent with the previous test. Increase to exposure time should be used to match the density of the previous test print. When both the whites and the blacks of a test print are acceptable, a full print can be made.
Film format diagram
35mm and 120 film drawn to the same scale, so the difference in negative size can be read directly off the diagram. 35mm film is 35mm wide, records a 36 x 24mm negative, and carries perforations along both edges. 120 film is 60mm wide, records a 60 x 60mm negative in the 6x6 frame shown here, and has no perforations at all. Both strips repeat their frames and run past the edge of the drawing, as film does. The larger negative is why 120 captures more detail and shows less grain than 35mm.